
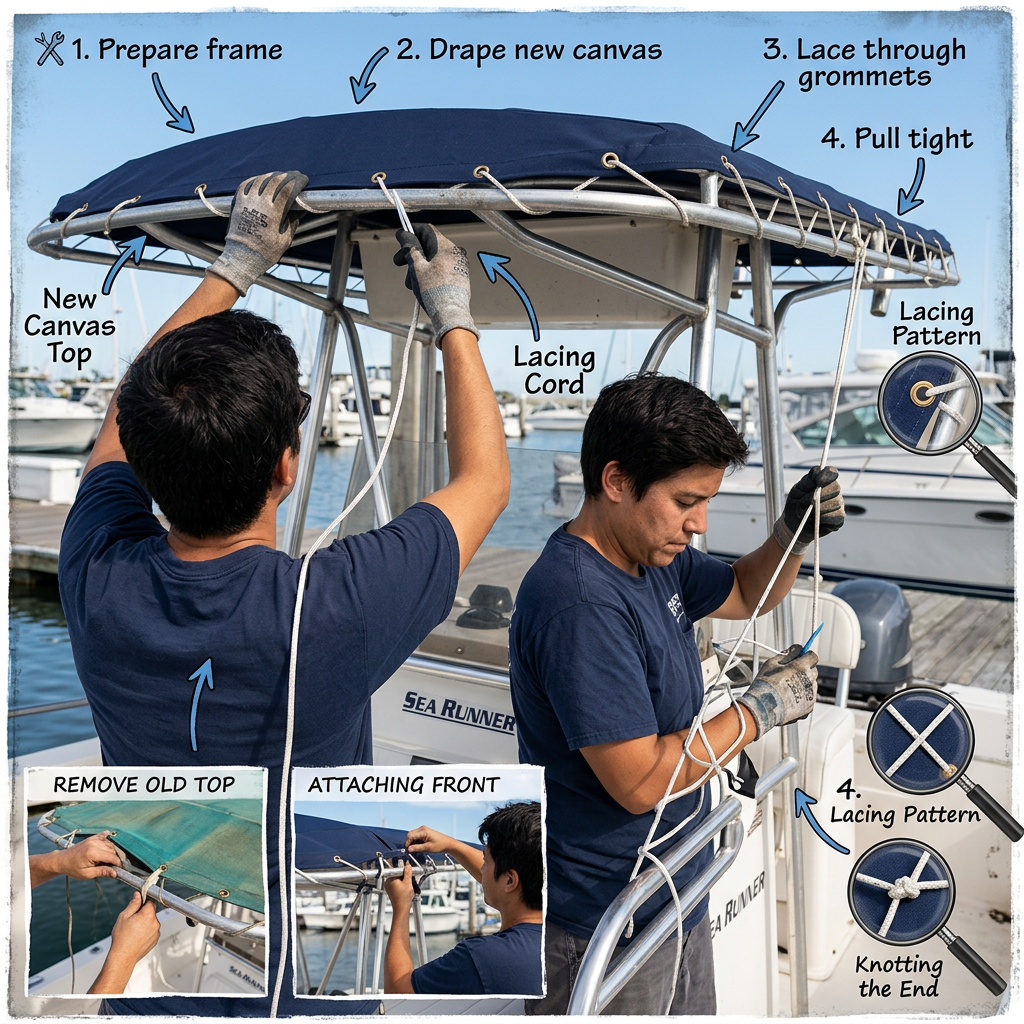
Yes, a careful owner can usually remove an old lace-on T-top canvas and install a replacement without paying a shop for the full job. The money-saving version is not “order something close and pull it tight.” It is: document the old top, confirm what the canvas maker needs, center the replacement, and lace it evenly enough to resist flutter without creating puckers at the grommets.
Choose the right level of DIY
There are three sensible ways to approach a worn T-top canvas:
- Canvas shop does everything: Best when the old top is badly distorted, the frame needs repair, the fabric has unusual cutouts, or you do not have safe access to the top.
- You remove the old canvas; a shop fabricates the replacement; you install it: Often the best labor-saving compromise. Ask before cutting anything whether the shop wants the old canvas intact as a pattern and what measurements or photos it needs.
- Order an exact replacement from the original T-top or canvas manufacturer: A good route when a tag, part number, and model-specific replacement are available. For example, AmeritexDirect says it can reproduce certain tagged Ameritex or Taylor Made T-top canvases to the boatbuilder’s original specifications. Check the manufacturer’s identification and ordering requirements first.
A replacement that is merely close in length and width may still be wrong at the corners, grommet spacing, frame bends, electronics-box cutout, or rod-holder openings. Canvas has a long memory, and a bad pattern will faithfully reproduce a bad fit.
Project snapshot
- Difficulty: Moderate. The lacing is simple; working safely at height and getting even tension take patience.
- Time: Allow a half-day for a first removal, cleanup, fitting, and installation. The lacing itself can take roughly 30–40 minutes once the top is correctly positioned.
- Best conditions: Dry weather, light wind, and a comfortably warm day. Stiff fabric is harder to align and tension evenly.
- Bring a helper: Strongly recommended for holding the canvas centered while you place temporary ties and begin lacing.
What you need
- Correct replacement canvas for your exact T-top frame
- Replacement lacing cord in the diameter specified by the canvas maker
- Six to eight temporary zip ties
- Scissors or side cutters for the old cord
- Tape measure, marker, and painter’s tape
- Stable ladder or work platform
- Mild soap, water, soft brush or cloth, and a towel for the frame
- A helper
About lacing cord: Black 3/16-inch polyester cord is a common starting point for many lace-on tops, but it is not universal. Measure the old cord and follow the replacement-canvas maker’s requirement before ordering. One example of this cord type is 3/16-inch solid-braid black polyester, specified by its maker as marine-grade polyester with UV, mildew, and chemical resistance. See the published rope specifications here. Do not force a larger cord through grommets or use a smaller cord just because it was already in the garage.
Before removal: preserve the information that makes the new top fit
Take photos before touching the old lacing. Shoot the top from above if possible, then photograph every corner, each frame bend, the center front and rear, and any cutout for antennas, lights, an electronics box, or rod holders. Take close-ups of the lacing where it wraps around the frame tube.
- Mark the old canvas BOW, STERN, PORT, and STARBOARD with painter’s tape or a washable marker in an inconspicuous area.
- Measure frame width and length at the outside of the tubing. Record the locations of bends, welded tabs, and cutouts.
- Measure grommet spacing in several places. Do not assume every side is identical.
- Measure the old cord diameter before discarding it.
- Contact the fabricator before removal. Some shops want the original canvas intact, even if it is torn, because it shows grommet locations and seam shape.
If the canvas is still reasonably intact, lay it flat after removal and photograph both sides with a tape measure in the frame. That documentation is cheap insurance if a question comes up after the new piece arrives.
Set up safely before working overhead
Do not balance on the gunwale, console, cooler, leaning post, or trailer fender. Position a stable ladder or purpose-built work platform on level ground or a secure dock, and move it rather than reaching too far. A helper should steady the ladder where appropriate and keep the canvas from becoming a sail in a breeze.
Stop and move the project to a shop if the boat is rocking in a slip, wind is loading the fabric, access requires climbing onto an unsupported hardtop, or the T-top frame has loose fasteners, cracked welds, or significant corrosion. Canvas replacement should not become an unplanned tower-repair project.
Step 1: Remove the old canvas without damaging the frame
- Find a reachable section of lacing and cut the cord only after you have measured and photographed it.
- Pull the cord out through the grommets rather than dragging a cut, frayed end across the fabric or powder-coated tubing.
- Lift the canvas away with your helper. Do not yank around antennas, lights, or wiring routed through the top.
- Inspect every grommet, seam, reinforcement patch, and frame contact point. A bent grommet, sharp burr, cracked weld, or loose frame fastener can quickly damage a new canvas.
- Wash salt, grime, and old lacing residue from the tubing with mild soap and water. Dry it before fitting the new top.
If the new canvas will be made from the old one, keep the original clean, labeled, and folded loosely. Do not throw it in a wet dock box and then ask the fabricator to decode the resulting fabric burrito.
Step 2: Position the replacement before you lace it
Lay the new canvas on the frame in the correct orientation. Check the maker’s labels, tag location, cutouts, seam layout, and your before photos. If anything does not line up without force, stop before lacing. A wrong orientation or incorrect replacement will not improve with more tension.
Use six to eight zip ties through selected perimeter grommets and around the frame, generally near corners and major alignment points. Keep them loose enough to adjust. Center the canvas fore-and-aft and side-to-side, aiming for a similar amount of exposed frame at corresponding corners. Manufacturer instructions commonly use temporary ties to establish that equal “reveal” before the final lacing begins. Fishmaster’s lacing instructions show this basic check-fit approach.
Step 3: Lace from the center outward
Follow the exact path supplied with your replacement canvas if it differs from the method below. For a typical grommeted canvas laced to round tubing, start at the center front when practical and work toward one side, then repeat in the reverse direction on the other. Some top designs begin at a different point, so the replacement maker’s instructions win.
The important part: keep the lacing under the canvas between grommets
The cord should run underneath the canvas from one grommet to the next. That turns the canvas edge downward instead of upward, helping it shed water and dirt rather than collecting both along the perimeter.
On one side, pass the cord through the top of a grommet, run it under the canvas to the next grommet, bring it up through that grommet, wrap around the tubing, and return through the same grommet. Continue one grommet at a time. On the opposite side, reverse the over/under wrap around the frame tube. That mirror-image direction prevents the fabric edge from twisting or kinking. RNR Marine illustrates this center-out method and the need to reverse the wrap direction from left to right. Review its T-top replacement-canvas lacing sequence before starting.
Do not cinch each grommet fully as you go. Make a first pass with the cord hand-snug, then work around again in small increments to bring tension up evenly.
Step 4: Tension the canvas without making “smileys”
The goal is a smooth, firm top that does not flutter at speed—not a drumhead pulled so tight that the edge rises in curved scallops between grommets. Those smile-shaped puckers concentrate load at the grommets and seams.
- Compare the exposed frame at matching corners as you tighten.
- Correct a large side-to-side mismatch before final tie-off.
- Use medium, even pulls rather than one hard pull at a single grommet.
- Leave a little extra cord at the final tie point for a post-run adjustment.
- Remove the zip ties only after the entire perimeter is laced and the canvas is centered.
Finish by looping the cord through or around the final eyelet/frame area as directed by the canvas maker, then secure it with a reliable knot. Trim only after you are satisfied with the fit. Heat-seal polyester cord ends carefully and only well away from the fabric, fuel vapors, and other flammables; melting the end is useful, setting a new canvas on fire is a poor way to save labor.
Check the finished top before the next run
- Look along every edge: it should appear straight and consistently turned downward.
- Press on the canvas and inspect for sharp frame contact, grommet strain, or loose lacing.
- Hose-test the top gently and watch where water drains. Water should not pool along a rolled-up perimeter edge.
- After the first outing, inspect the lacing again. Fabric and cord can settle, especially after the first period of wind loading.
Common mistakes that turn a simple job into a re-do
- Cutting the old canvas apart before the fabricator approves: You may have destroyed the most useful pattern reference.
- Ordering cord by habit: Verify diameter and material with the canvas maker rather than assuming every top takes 3/16-inch cord.
- Starting at a corner: It can pull the whole canvas off-center before you notice.
- Running cord over the canvas between grommets: The edge can turn upward and trap water and grime.
- Using the same frame-wrap direction on both sides: This can twist the canvas edge and create a kink.
- Overtightening: Flutter is bad, but grommet and seam overload is not a cure for it.
- Ignoring frame defects: New fabric will not make loose T-top mounts, cracked welds, or sharp corrosion pits less serious.
When a canvas shop is the better call
Use a shop when the T-top is custom, the old canvas is missing, the top includes complex zippers or enclosure panels, the frame has been modified, or the replacement needs new grommets, reinforcements, or cutouts located from scratch. Also hand the job off if the frame needs welding or repair, or if safe ladder access is not realistic.
For a straightforward, correctly made replacement on a sound tubular frame, though, this is a very manageable DIY project. Take better photos than you think you need, center before tensioning, lace each side as a mirror image, and let the final fit—not brute force—tell you when it is tight enough.
Sources and further reading
- RNR Marine: T-top replacement canvas lacing instructions
- Fishmaster: T-top canopy lacing instructions
- AmeritexDirect: replacement T-top canvas identification and ordering